An end-to-end CI/CD pipeline on Azure DevOps
From a local commit to a zero-downtime production release — repos, build artifacts, service connections, gated approvals and slot swaps, in the order you actually build them.
Amit Shivpratap Singh • • 9 min read
On this page
Step 1 — Local setup and pushing code to Azure Repos
Everything starts before any automation exists. Initialise the repository locally, add the Azure Repos remote, and push a first commit. The pipeline you build later is only ever as trustworthy as the history it reads from.
Once the code is in, protect the main branch immediately rather than later. Require pull requests, at least one reviewer, and a successful build before merge. Branch policies are what turn CI from a report into a gate — without them, a red build is a notification nobody has to act on.
# Start from the project root
git init
git add .
git commit -m "chore: initial commit"

# Point at the Azure Repos remote and publish main
git remote add origin https://dev.azure.com/<org>/<project>/_git/<repo>
git branch -M main
git push -u origin mainStep 2 — The continuous integration build pipeline
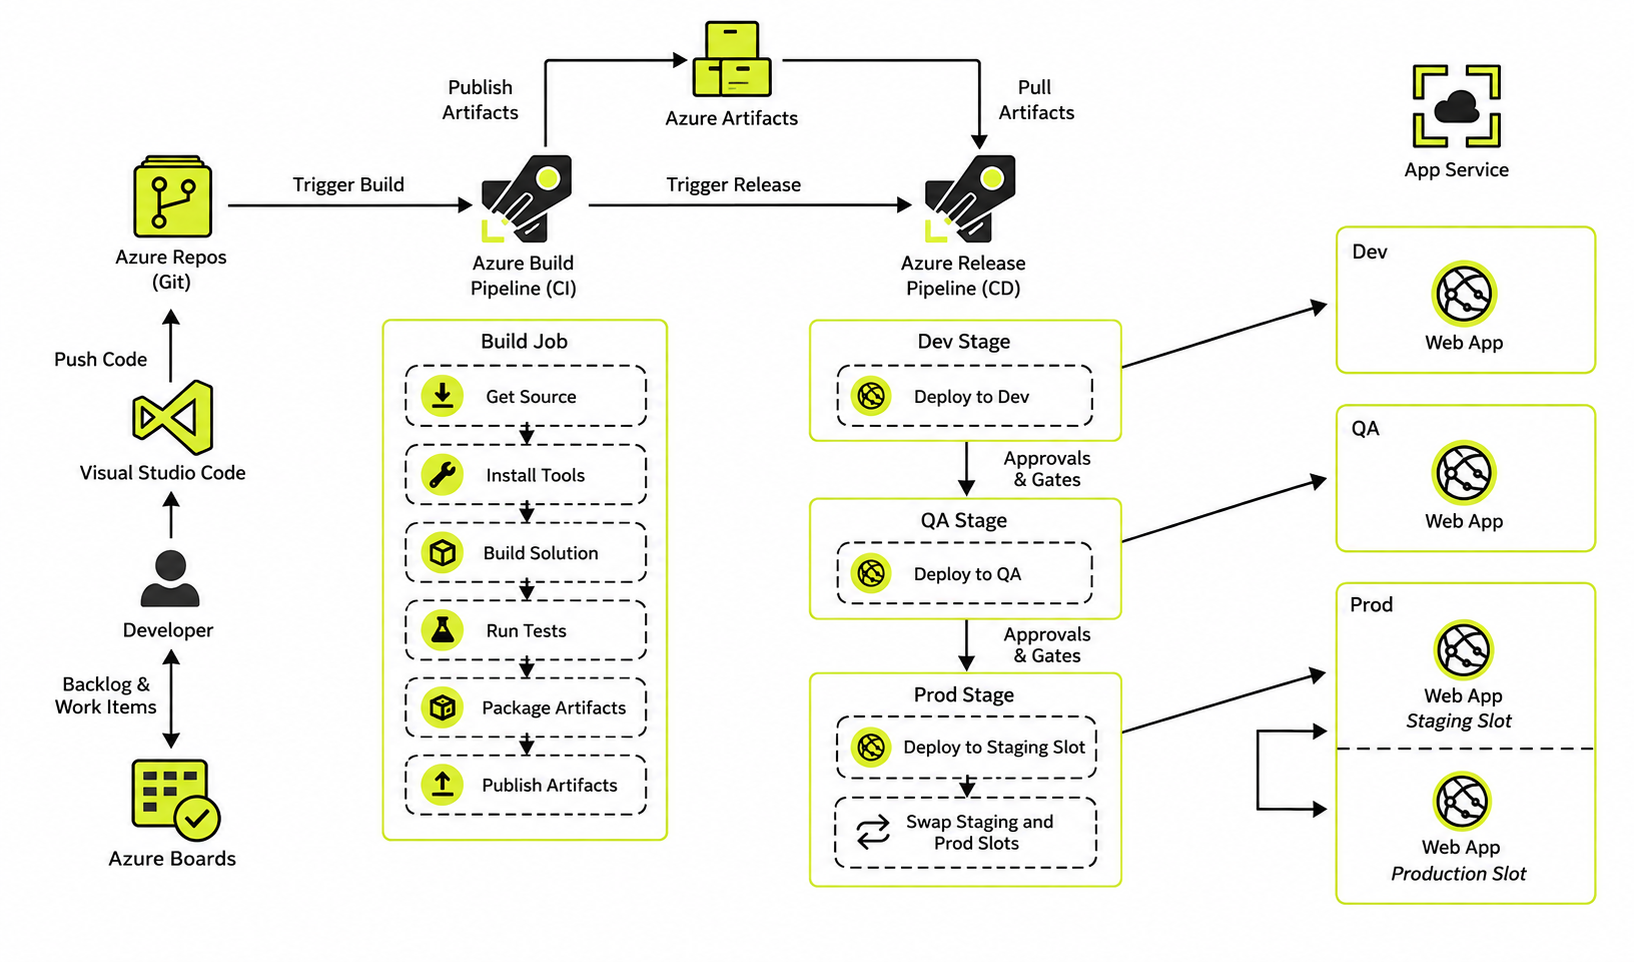
With code in Azure Repos, the CI pipeline automates compiling, testing and packaging. Define it as YAML committed alongside the code, not clicked together in the UI: the pipeline then reviews, versions and rolls back exactly like the application does.
The job of CI is to answer one question quickly — is this commit releasable? Restore dependencies, build, run tests, and publish the result as a build artifact commonly named "drop". That artifact is the single immutable thing every later environment deploys, which is what guarantees Dev, QA and Production run identical bits.
Keep it fast. A pipeline that takes twenty minutes stops being a feedback loop and starts being an interruption people work around.
trigger:
  branches:
    include: [ main ]

pool:
  vmImage: ubuntu-latest

steps:
  - task: NodeTool@0
    inputs:
      versionSpec: "20.x"

  - script: npm ci
    displayName: Install dependencies

  - script: npm run build
    displayName: Build

  - script: npm test -- --ci
    displayName: Test

  # Package the built output as the immutable "drop" artifact
  - task: ArchiveFiles@2
    inputs:
      rootFolderOrFile: "$(System.DefaultWorkingDirectory)"
      includeRootFolder: false
      archiveFile: "$(Build.ArtifactStagingDirectory)/app.zip"

  - task: PublishBuildArtifacts@1
    inputs:
      PathtoPublish: "$(Build.ArtifactStagingDirectory)"
ArtifactName: dropStep 3 — Creating a service connection
To push that artifact to an Azure App Service, Azure DevOps needs authorised access to your subscription. That relationship lives in a Service Connection, created under Project Settings, and it is the piece most worth getting right.
Prefer workload identity federation over a service principal with a client secret. Federation exchanges a short-lived token at deploy time, so there is no credential sitting in the project waiting to expire at an inconvenient moment or leak into a log. If you must use a secret, put an expiry reminder in the calendar the same day you create it.
Scope the connection narrowly. It should reach the specific resource group holding the App Services it deploys to, with the Contributor role there and nothing wider. A connection scoped to the whole subscription is a standing invitation to blast radius. Then restrict which pipelines may use it rather than granting access to all.
Step 4 — Continuous delivery through environments
With the artifact published, the release pipeline delivers it onward. Enable the continuous deployment trigger so a successful build starts a release automatically — a manual step here is where pipelines quietly rot.
The important idea across all three stages: nothing rebuilds. Each environment deploys the same zip that CI produced, with configuration supplied per environment through app settings. Rebuilding per environment reintroduces exactly the drift the artifact was designed to eliminate.
Stage A — Dev
The first stage takes the latest zip from the drop artifact and publishes it to the Development App Service through the service connection. No approvals, no ceremony: Dev exists to be broken, and the faster a change lands there the sooner you learn whether it works outside a laptop.
Stage B — QA, with gated approvals
QA is where you stop code moving forward on autopilot. Configure pre-deployment approvals so a named person signs off before the release enters QA, and post-deployment approvals so testing has to be acknowledged before Production becomes reachable.
Approvals should be a decision, not a formality. Give approvers something to check against — the test run, the smoke results, the changes included in the release — otherwise you have added latency without adding safety.
Stage C — Production, with a zero-downtime slot swap
Deploying straight onto a live App Service copies files underneath running requests. Users see HTTP 500s, half-loaded assets, or a cold start while the app recycles. Deployment slots remove that window entirely.
Deploy the artifact to a staging slot instead. It warms up there on its own hostname with production-like settings, and you can smoke-test it before any traffic arrives. When it looks healthy, swap: Azure exchanges the routing between staging and production, so the instance receiving live traffic is one that has already started and warmed its caches.
Mark environment-specific values as deployment slot settings so connection strings stay with their slot rather than travelling across during the swap. And keep the old build sitting in the staging slot afterwards — rolling back becomes a second swap that takes seconds, which is the fastest recovery mechanism you will ever have.
- stage: Production
  jobs:
    - deployment: DeployProd
      environment: production
      strategy:
        runOnce:
          deploy:
            steps:
              # 1. Publish into the staging slot, not production
              - task: AzureWebApp@1
                inputs:
                  azureSubscription: "svc-conn-prod"
                  appName: "my-app"
                  deployToSlotOrASE: true
                  resourceGroupName: "rg-my-app"
                  slotName: "staging"
                  package: "$(Pipeline.Workspace)/drop/app.zip"

              # 2. Warm the slot and fail fast if it is unhealthy
              - script: |
                  curl --fail --silent --show-error \
                    https://my-app-staging.azurewebsites.net/healthz
                displayName: Smoke test staging slot

              # 3. Swap — routing changes, no file copy under live traffic
              - task: AzureAppServiceManage@0
                inputs:
                  azureSubscription: "svc-conn-prod"
                  Action: "Swap Slots"
                  WebAppName: "my-app"
                  ResourceGroupName: "rg-my-app"
SourceSlot: "staging"What the pipeline is really buying you
Read the four steps together and a pattern emerges: build once, authorise narrowly, promote deliberately, and switch traffic rather than overwrite it. Each stage removes a category of failure instead of merely automating a task.
That is the difference between a pipeline that saves typing and one that lets you release on a Friday afternoon without checking your phone all evening.